Access and Purpose
Clicking the Output icon ![]() in the toolbar to can open the Output pane. This pane is however open by default when you create an eGrabber.
in the toolbar to can open the Output pane. This pane is however open by default when you create an eGrabber.
In this pane, you can perform the following actions:
| ● | View the images being acquired or an image stored in a buffer or saved in a recorder container. See Acquire and Browse through Images. |
| ● | Use the visualization tools that help you configure your system. |
The controls to access the visualization tools become visible when hovering over the image in the Output pane.
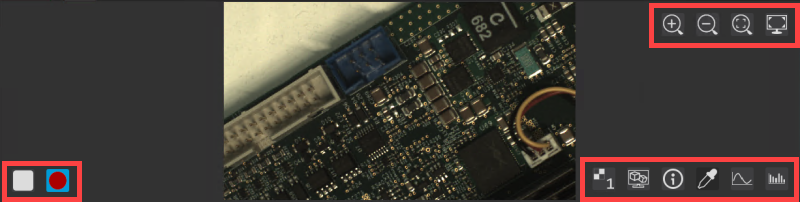
Output pane - controls
|
Control |
Name |
Click this button to ... |
||||||||||||
|---|---|---|---|---|---|---|---|---|---|---|---|---|---|---|
|
|
Play vs. Stop |
Start vs. stop the image acquisition. The Play / Stop button is a toggle control that corresponds to the action you can perform. |
||||||||||||
|
|
Record off vs. Record on |
Record vs. stop recording acquired images in the recorder container. The Record off / Record on button is a toggle control that corresponds to the current recording status. |
||||||||||||
|
|
Zoom in |
Zoom in manually in an image. Alternatively, press CTRL while rotating the mouse wheel away from you. |
||||||||||||
|
|
Zoom out |
Zoom out manually in an image. Alternatively, press CTRL while rotating the mouse wheel toward you. |
||||||||||||
|
|
Fill to view |
Enable the fit-to-view zoom. The fit-to-view zoom is disabled when you zoom in or out manually. |
||||||||||||
|
|
Fullscreen |
Display the image in full screen. |
||||||||||||
|
|
Bayer decoding method |
Select the requested decoding method for Bayer images:
The button is only displayed when Bayer images are stored in the buffers. |
||||||||||||
|
|
Share with Open eVision Studio |
Save the current image to make it available in Open eVision Studio. |
||||||||||||
|
|
Source information |
Enable/Disable the display of source information in the upper left corner of the Output pane. |
||||||||||||
|
|
Pixel components |
Enable/Disable the display of pixel components when hovering over the image with the mouse. |
||||||||||||
|
|
Line profile |
Display a line profile on the top of the displayed image, and the corresponding line profile plot at the bottom of the Output pane. |
||||||||||||
|
|
Histogram |
Display the image histogram at the bottom of the Output pane. |
eGrabber source
The following information on images being acquired or being stored to the recorder container is displayed:
| ● | image size (width/height) |
| ● | pixel format |
| ● | frame rate (frames/sec) |
| ● | line rate (lines/sec) |
| ● | data rate (Megabytes/sec) |
| ● | delivered buffers |
| ● | diagnostic counters for Coaxlink sources: |
| □ | rejected scans: number of scans completely missed (line-scan camera) |
| □ | rejected frames: number of frames completely missed (area-scan camera) |
| ● | diagnostic counters for Gigelink sources: |
| □ | lost frames: number of frames completely missed |
| □ | lost packets: number of GigE Vision stream packets missed |
Recorder container opened for playback
The following information related to the records stored in the container is displayed:
| ● | timestamp |
| ● | pixel format |
| ● | image size (width/height) |
When you click ![]() to enable the pixel component display, the mouse cursor turns into
to enable the pixel component display, the mouse cursor turns into  .
.
As you hover over the image, a small table displays the components of hovered-over pixel, as shown on the screenshots below:
| ● | X/Y: horizontal/vertical position of the pixel on the image |
| ● | L: luminance decimal value |
| ● | RGB: red/green/blue decimal values |
| ● | Offset: pixel position in bytes in the pixel definition table |
| ● | Bytes: luminance or RGB expressed in hexadecimal values |
With Bayer pixel formats, the offset and bytes values are displayed in two lines as the red, green and blue data are spread in two pixel lines.
![]()
Pixel components with a Mono8 pixel format
![]()
Pixel components with BayerGB8 pixel format
You can share an image with Open eVision Studio 1.0 installed on the same computer as eGrabber Studio.
| ● | When you click |
In Open eVision Studio, you can load the shared image in one of the following ways:
| ● | Select Image > Open from eGrabber Studio from the menu bar. |
| ● | Click the eGrabber icon  in the toolbar. in the toolbar. |
| ● | Right-click in an open image and select Load from eGrabber Studio. |