| 1. | From the Windows Start menu, search for and open eGrabber Studio. |
| 2. | In the Sources area, select Gigelink. |
| 3. | In the eGrabbers area, identify the desired Gigelink device and double-click its stream. |
The stream opens directly in the main window displayed as a tab.
The steps to configure a GenApi feature manually are highlighted on the screenshot below.
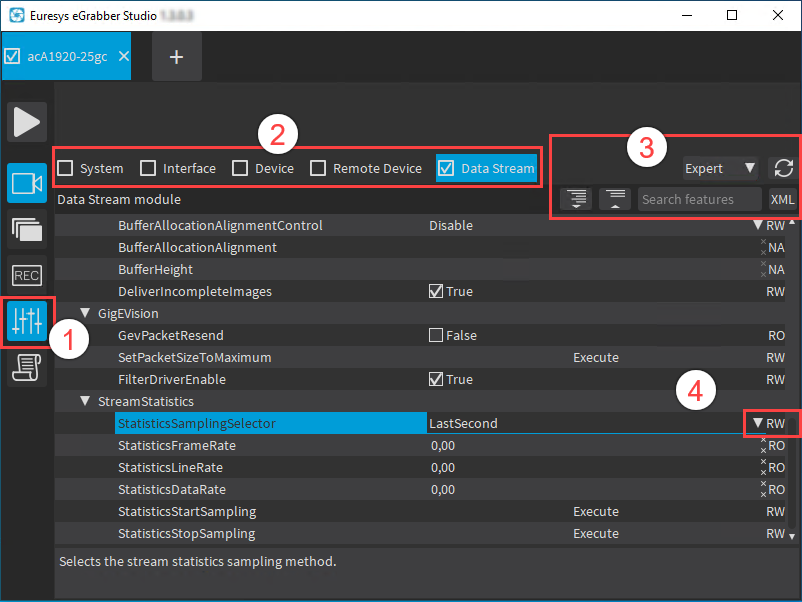
| 1. | Once you have opened your GigE Vision stream in a window, click the Features button to open the Features pane. |
| 2. | In the Features pane, select the GenApi module you want to configure features in. |
| 3. | If requested, use the controls on the right to expand/collapse, filter and/or search for GenApi features. |
| 4. | When you have identified the feature you want to modify (it must be RW or WO to be editable), select or type the requested value and press ENTER on the keyboard. |
Setting GenApi features
You can also define the requested values for several GenApi features in a script that you can apply in eGrabber Studio.
| 1. | Prepare your script. |
You can refer to the following sources:
| □ | sample configuration script for a GigE Vision camera connected with Gigelink |
| □ | detailed information on the syntax used in Euresys Script language. |
| 2. | Save your script on the computer where eGrabber Studio is installed. |
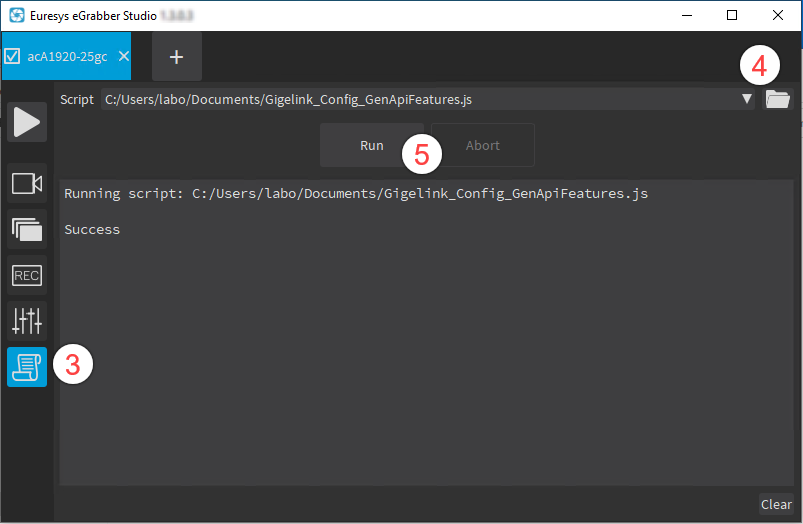
| 3. | In eGrabber Studio, once you have opened your GigE Vision stream in a window, click the Scripts button. |
See screenshot below.
| 4. | Select your script using the Folder icon. |
| 5. | Click Run to execute the script. |
The result of the script execution appears in the Script pane.
This section goes through a sample configuration for a GigE Vision camera, and provides more information on its instructions.
In the following sample script:
| 1. | First, you configure the camera to work in the required mode to be able to use action commands. |
| 2. | Then, you configure the action command settings. |
| 3. | Finally, you configure the action 1 as a trigger for acquiring a frame. |
// This script is used to configure the GenApi features so that a PC can send
// the appropriate Action Command to trigger a GigE Vision camera over the network.

var configure = require ('coaxlink://configurator.js');

var parameters = {
	OperatingMode: "SC",
	AcquisitionMode:"SingleFrame",
	ExposureTime:5500,
};
configure(grabbers[0], parameters);

grabbers[0].StreamPort.set("ControlRemoteDevice", "False");
grabbers[0].RemotePort.set("ActionDeviceKey", 0xcafebabe);
grabbers[0].DevicePort.set("ActionDeviceKey", 0xcafebabe);
grabbers[0].RemotePort.set("ActionSelector", 1);// must match 'Action1' below
grabbers[0].RemotePort.set("ActionGroupKey", 0x42);
grabbers[0].RemotePort.set("ActionGroupMask", 0xffffffff);
grabbers[0].DevicePort.set("ActionGroupKey", 0x42);
grabbers[0].DevicePort.set("ActionGroupMask", 0xffffffff);

// following parameters configure Action1 as frame trigger
grabbers[0].RemotePort.set("TriggerSelector", "FrameStart");
grabbers[0].RemotePort.set("TriggerMode", "On");
grabbers[0].RemotePort.set("TriggerSource", 'Action1');The following line loads the configurator function into the variable configure.
var configure = require ('coaxlink://configurator.js'); With the following instructions, you create the parameters variable and store parameter names and values in the variable.
var parameters = {
	OperatingMode: "SC",
	AcquisitionMode:"SingleFrame",
	ExposureTime:5500,
};With the following instruction, you apply the configuration script (loaded in the configure variable) to the grabbers[0] to set the parameters stored in the parameters variable.
For more information on built-in objects grabbers, refer to the Euresys GenApi script section in the Programmer's Guide, sample script doc/grabbers.js.
configure(grabbers[0], parameters);| 1. | In the first instruction below, you deactivate the automatic acquisition start and stop, as it can interfere while you are configuring the action command feature. |
| 2. | In the instructions that follow, you configure features used by the action command feature, i.e. DeviceKey, GroupKey and GroupMask, both on the device side and remote device side. |
grabbers[0].StreamPort.set("ControlRemoteDevice", "False");
grabbers[0].RemotePort.set("ActionDeviceKey", 0xcafebabe);
grabbers[0].DevicePort.set("ActionDeviceKey", 0xcafebabe);
grabbers[0].RemotePort.set("ActionSelector", 1);// must match 'Action1' below
grabbers[0].RemotePort.set("ActionGroupKey", 0x42);
grabbers[0].RemotePort.set("ActionGroupMask", 0xffffffff);
grabbers[0].DevicePort.set("ActionGroupKey", 0x42);
grabbers[0].DevicePort.set("ActionGroupMask", 0xffffffff);With the following instructions, you configure the FrameStart to be triggered via action command 1.
// following parameters configure Action1 as frame trigger
grabbers[0].RemotePort.set("TriggerSelector", "FrameStart");
grabbers[0].RemotePort.set("TriggerMode", "On");
grabbers[0].RemotePort.set("TriggerSource", 'Action1');