Configure the Network Interface Card
Overview
This section describes how to configure the network interface card (NIC) in MS Windows once the network card is installed.
The configuration includes the following steps:
| 1. | Access the network interface card settings |
| 2. | Check the filter driver |
| 3. | Set the IP address of the network interface card |
| 4. | Select one of the following methods to adjust settings: |
| □ | Adjust settings with the Gigelink NIC configuration wizard |
| □ | Adjust settings manually |
To access the Network Interface Card settings:
| 1. | Open the Ethernet settings from the Windows Start menu |
| 2. | Select Change adapter options to access the list of network connections in Control Panel\Network and Internet\Network Connections. |
| 3. | Right-click the network interface card you want to configure and select Properties from the contextual menu. |
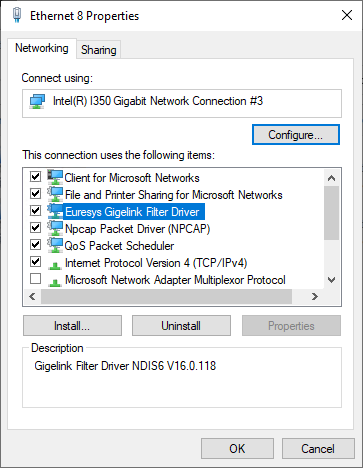
The Properties dialog box of your Network Interface Card opens.
When the eGrabber driver is installed, the filter driver is enabled by default. In an operational environment, we recommend to keep the filter driver enabled. Check that the filter driver is enabled in your NIC properties, as shown on the screenshot below.
The filter driver operates directly with the NIC driver to intercept and handle the stream packets. It then sends these priority stream data directly to the application buffer, bypassing the system network IP stack.
For test purposes, you can disable the filter driver in the NIC properties.
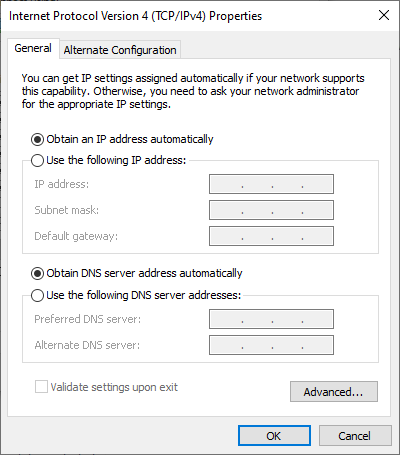
In the Properties dialog box, select Internet Protocol Version 4 (TCP/IPv4) and click Properties.
| ● | Select Obtain an IP address automatically and click OK to validate. |
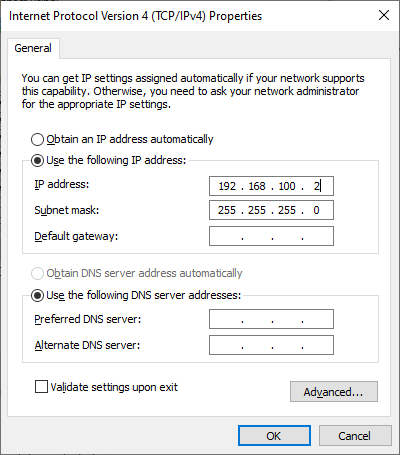
| 1. | Select Use the following IP address and define the IP address settings, for example as follows: |
| □ | IP address : 192.168.XXX.2, with XXX in the range [0-255]. |
| □ | Subnet mask : 255.255.255.0. |
| □ | Default gateway remains empty. |
If you use a multi-port NIC to connect to multiple cameras point-to-point, each point-to-point wire is considered as a separate LAN, you should define fixed NIC addresses and subnets for each port so that they do not collide, for example 192.168.100.2, 192.168.101.2, 192.168.102.2, etc.
| 2. | Click Advanced and set the metric to 1001 in the IP Settings tab, if it is relevant to help keep unrelated traffic out of the GEV network: |
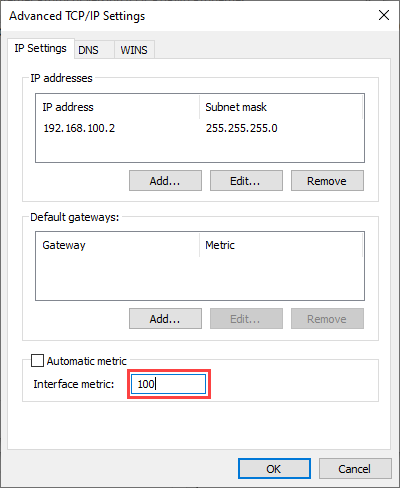
| 3. | Click OK twice to validate and come back to the Properties dialog box. |
You can use the Gigelink NIC configuration wizard to automatically adjust the Jumbo Packet, Receive Buffer and Interrupt Moderation.
Therefore, proceed as follows:
| 1. | Launch the wizard by selecting Gigelink NIC configuration wizard in the Euresys eGrabber folder of your Start menu |
| 2. | Identify the network cards on which you intend to run GigE Vision cameras |
| NOTE: | network cards on which performance parameters cannot be tuned will not be listed by the tool |
| 3. | Use the check box(es) next to the interface(s) name to optimize all parameters for GigE Vision traffic |
| 4. | Use per-parameter check box if you only want to change some of the parameters for a given interface |
| 5. | Click 'OK' to apply the selected changes and close the Gigelink NIC configuration wizard. |
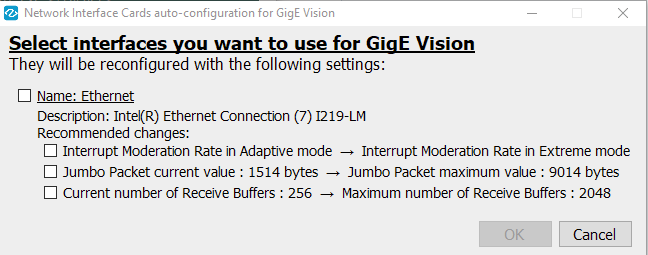
| ● | Changing performance parameters on a network interface card intended for general use may result in increased latency in some network applications or produce undesired notifications within your IT infrastructure. |
| ● | Performance parameters that are already in optimal configuration will not be shown. If all the parameters of a given network interface card are optimal, the card is shown grayed with the mention "Already configured with optimal parameters". |
If you need to pick intermediate values for any performance parameter or want to revert to generic processing on your network card, you can do so in the Properties dialog box
| 1. | Access the network interface card settings |
| 2. | Enable the Jumbo Packet settings |
| 3. | Set the Receive Buffer settings |
| 4. | Set Interrupt Moderation Settings |
Enable the Jumbo Packet settings allows you to transfer and receive larger streaming packets and reduce processing overhead.
| 1. | In the Properties dialog box, click Configure. |
| 2. | In the dialog box, select the Advanced tab, select the Jumbo Packet in the Property list. |
| 3. | In the Value field, select the value 9014 Bytes as the maximum transmission unit (MTU) for the jumbo packets: |
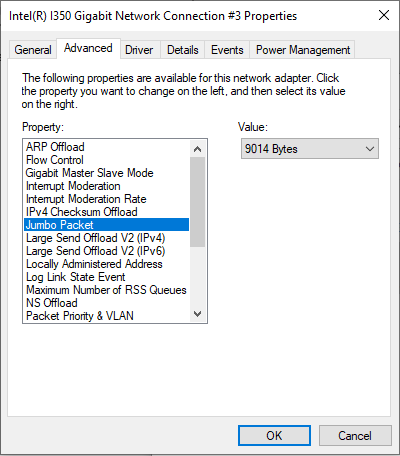
| 4. | Set the next advanced parameter described below. |
Make sure that you enable the jumbo packets on the camera side (see Configure the Camera Network Settings), and that other possible devices in the network between the camera and the host computer have jumbo frames enabled with the same MTU.
The Receive Buffers setting allows you to define how much system memory is dedicated to store received packets. Increasing the buffers helps improve the reliability of the network traffic, but consumes system memory.
| 1. | In the same Advanced tab where you have set the jumbo packets, select the Receive Buffers in the Property list. |
| 2. | In the Value field, select the value 40962 for receive buffers: |
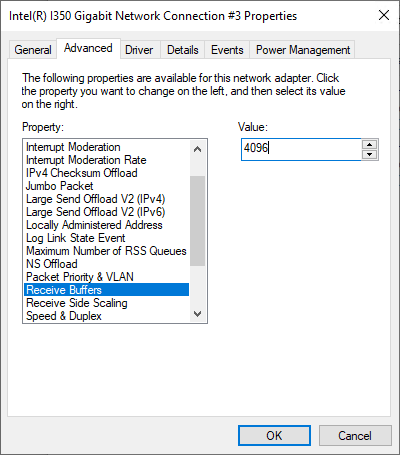
| 3. | Set the next advanced parameter described below. |
The Interrupt Moderation settings allow you to define how often the adapter interrupts the system to handle the incoming (and outgoing) packets.
With GigE Vision cameras, it is more appropriate to set the highest level for interrupt moderation rate. This means that the NIC does not interrupt the processes, which reduces the CPU utilization. Instead the NIC driver actively decides when to check and handle the received packets.
| 1. | In the same Advanced tab where you have set the receive buffers, select Interrupt Moderation in the Property list and check that the setting is enabled. |
| 2. | Select Interrupt Moderation Rate in the Property list. |
| 3. | In the Value field, select Extreme. |
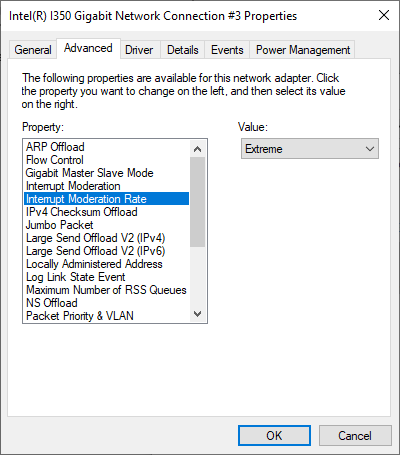
| 4. | Click OK to validate all settings you have defined and come back to the panel displaying the network connections. |
When the eGrabber installer is done installing Gigelink component, it will ask the user whether they want to run the NIC configuration wizard.
If the installation is launched in batch mode, no attempt to configure the NIC card is done. The settings manipulated by the Gigelink configuration Wizard are available through the powershell Set-NetAdapterAdvancedProperty commandlet, e.g.
Set-NetAdapterAdvancedProperty -Name “Ethernet” -RegistryKeyword “*JumboPacket” -Registryvalue 9014
Similar commands could be added to your custom installation script to complete installation with performance tuning according to your system setup.