Trigger Actions on Traces
See also: Memento Rules window
Use of Memento rules
The traces extracted from the viewer buffer are displayed in the Memento application.
The Memento Rules allow you to trigger one of the following rule actions when a trace meets all the rule settings defined in the rule:
| ● | highlight traces in the message list (changing the background and/or the font color of the trace information). |
| ● | hide traces. |
| ● | start / stop saving the traces into a dump file. |
| ● | stop in a Go Back action. |
The Memento Rules are applied to all traces extracted from the viewer buffer and displayed in the Memento application.
From the Memento main window, select  in the Control bar, then Rules in the Memento Configuration window.

The figure on the Rules button indicates how many rules are active.
The Memento Rules dialog box opens.
| ● | A Memento rule includes a rule action that specifies the action to be performed, and rule settings that specify the criteria that a trace has to meet for the rule action to be triggered. |
| ● | By default, rules 1 to 7 are predefined, but they can be modified. |
| ● | Only enabled rules and enabled settings in a rule are taken into account. |
| ● | The Memento application applies the rules from the smallest to the highest number. |
| ● | When a trace meets a rule and the rule action doesn't include "Continue", the action associated to that rule is applied and the trace is not evaluated against another rule. |
| ● | When a trace meets a rule and the rule action includes "Continue", the action defined for that rule is applied but the trace is reevaluated against the next applicable rule. |
The last rule (without a "Continue" action) applicable to the trace is fully applied.
| ● | When a rule is based on a verbosity criterion, the rule applies to the traces having that verbosity level and less verbose levels. |
Refer the section
Introduction
Rules with Highlight, Background, Text Color actions, and their Continue counterpart, allow you to customize the trace display.
When such a rule is applied, it affects the trace display in the Trace column of the message list.

By default, the Memento rules 2 to 7 set a predefined highlight (background and text color) based on the verbosity level.
See the sectionMemento Rules window for a detailed description of the fields.
Modify the trace display
To define or modify a rule to customize the trace display, proceed as follows:
| 1. | In the Memento Rules window, do one of the following actions: |
| □ | To enable an existing rule, select the Enable check box and go to step 2. |
| □ | To disable an existing rule, deselect the Enable check box. |
| □ | To modify the settings and/or action of an enabled rule, go respectively to step 2 and/or 3. |
| □ | To add a new rule, right-click the row above which you want to add a rule and select Add before from the context menu. |
Other commands are available to add and move rows in the context menu.
| 2. | In a given rule, define the rule setting you want to use: |
| □ | Select the check box in front of the rule setting. |
| □ | Type or select the value to be used as filtering criterion. |
| 3. | In the rule, define the requested action. |
See Action field for more information on the various actions.
| 4. | If requested, invert the filter rule by selecting the Not check box: |
| □ | When the check box is not selected, the rule action is executed only when all the enabled rule settings are met. |
| □ | When the check box is selected, the action is always executed except when all the enabled rule settings are met. |
| 5. | If requested, change the rule position by selecting Move up current row or Move down current row from the Edit menu. |
| 6. | Click Apply to apply the updated rule configuration to the data displayed in the Memento application. |
In this example:
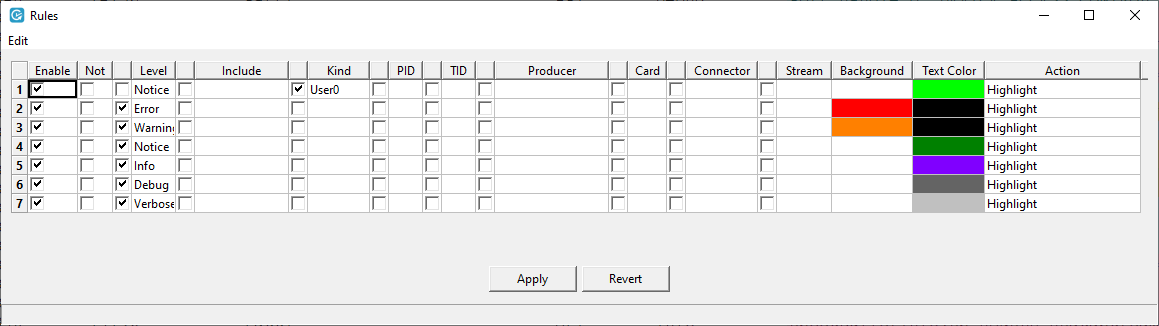
| ● | With the rules 1 to 3, the traces of verbosity level Error, Warning and Notice have a specific background to be more visible. |
| ● | With the rule 6, the traces of verbosity level Verboseand less verbose levels without an enabled rule have no background and a light grey font color. |
Consequently, the traces of verbosity level Info and Debug meet this rule.
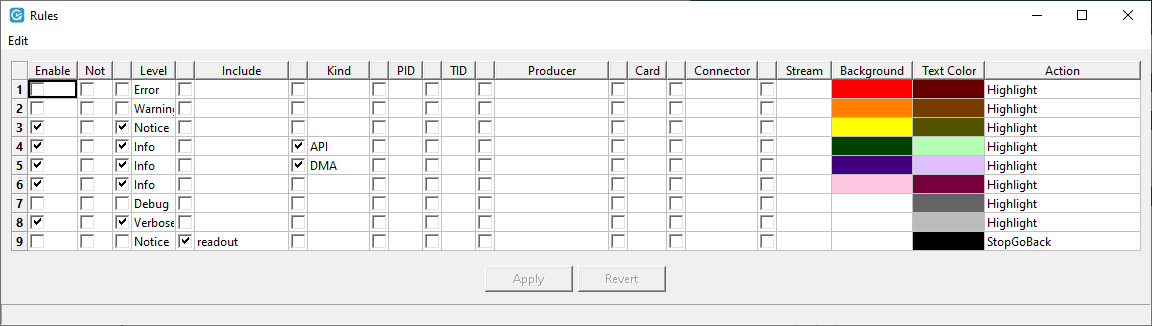
In this example:
| ● | The rule 3 applies to the traces with Notice verbosity and lower verbosity levels (Error, Warning), as rules 1 and 2 are not enabled. |
| ● | The rules 4 and 5 apply to the traces with Info verbosity and respectively API or DMA kinds: these traces have a specific highlight. |
| ● | The rule 6 applies to the traces with Info verbosity and any kind other than API or DMA: these traces are all highlighted in the same way. |
| ● | The rule 8 applies to the traces with Verbose verbosity and lower verbosity levels without specific rule (Debug): these traces are all highlighted the same way. |

In this example:
| ● | With the rules 1 and 2, the traces of verbosity level Info and kind DMA or API have a specify highlight (background and color). |
| ● | With the rule 3, other traces of verbosity level Info are highlighted differently. |
| ● | With the rule 4, where the Not parameter is selected, all traces with a verbosity level that is notInfo have a dark red font and no background. |

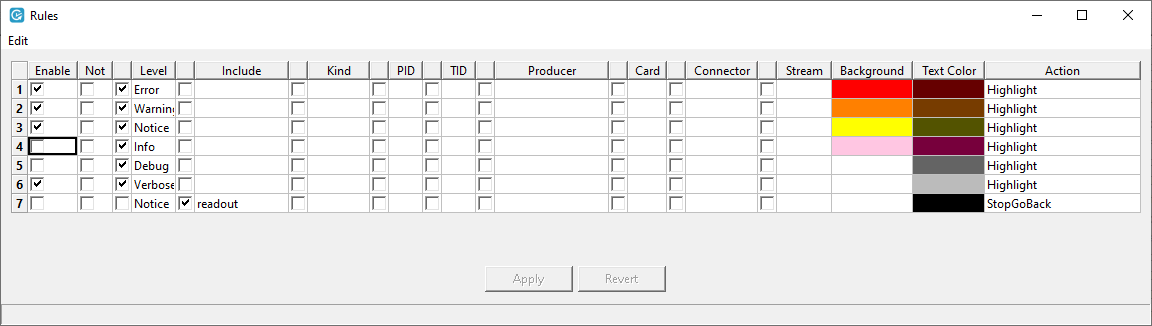
In this example:
| ● | With the rule 3, the traces of verbosity level Verbose and less verbose (except Error and Warning) that contain the text string Camera readout: Start will have a yellow background. |
| ● | With the rule 4, all other traces (except traces of verbosity level Error and Warning) will have the same text color, but no background. |
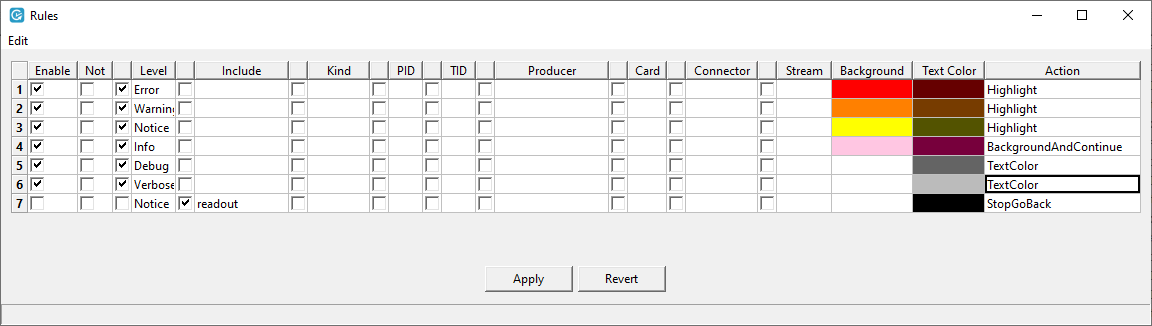
In this example:
| ● | The rule 4 applies to the traces with Info verbosity only as all rules for traces with lower verbosity levels are enabled: |
Consequently, a pink background is applied to the traces with Info verbosity.
However, the traces with Info verbosity are evaluated against the next rule as the action in rule 4 is BackgroundAndContinue.
| ● | The rule 5 therefore applies to the traces with Debug and Info verbosity: |
Consequently, a grey text color is applied to the traces with Debug and Info verbosity as the action in rule 5 is TextColor.
Using StartDump or StopDump rules in combination with Trigger Setup options set in the Dump window allows you to start or stop automatically the backup to a dump file when a trace matches the rule.
| 1. | Add a row by right-clicking in the table and selecting Add before or Add Top from the context menu. |
If you define several StartDump or StopDump rules, the first trace that matches one of the rules will trigger the rule action.
| 2. | In the added row, define a rule with a StartDump or StopDump action and the settings a trace has to meet to trigger the action. |
| 3. | Select the Enable check box to activate the defined rule. |
| 4. | Click Apply to save the changes in the rule configuration. |
| 5. | In the Dump window, set up the dump settings and initiate the dump file, as explained in the procedure Save future and/or past traces to a dump file from the Memento application. |
If you have defined a StartDump rule, the dump file is initiated when you click Start in the Dump window, but the traces start being backed up to the dump file only when a trace meets the StartDump rule settings.
In the Dump window, the Start button changes to Waiting and the message Dump is waiting for trigger is displayed at the bottom of the Dump window.
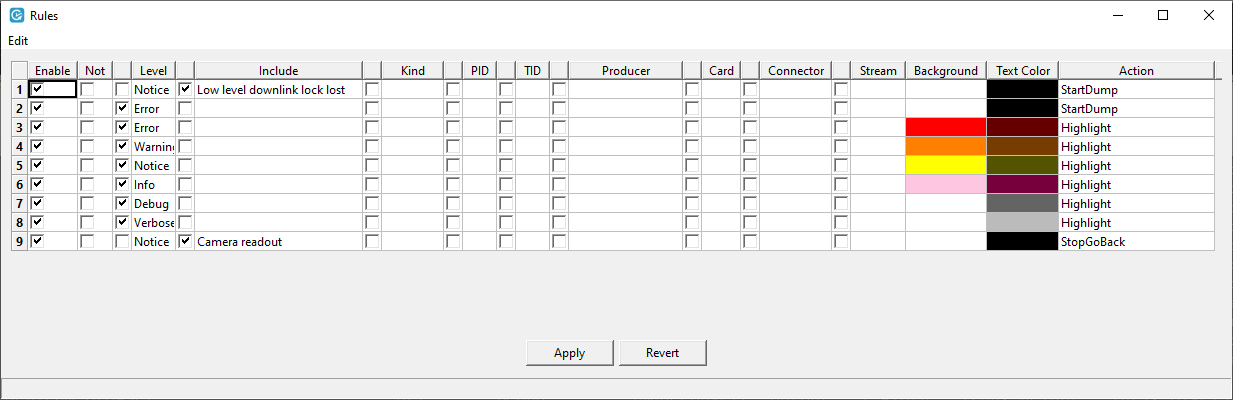
In this example, the rows 1 and 2 are StartDump rules:
| ● | If a trace contains the Low level downlink lock lost text string, the traces from the ring buffer will start being backed up to the dump file. |
| ● | If a trace of Error verbosity level is issued, the traces from the ring buffer will start being backed up to the dump file. |
Once you have initiated the dump file (clicked Start in the Dump window), the first trace that matches one of these StartDump rules triggers the backup to the dump file.
Using the StopGoBack rules in combination with the Apply StopGoBack rules option set in the Go Back window allows you to stop in a Go Back action each time a trace matches the rule.
| 1. | Add a row by right-clicking in the table and selecting Add before or Add Top from the context menu. |
The row position does not matter. If you define several StopGoBack rules, any trace that matches one of the rules will trigger the rule action. So both rules will be applied.
| 2. | In the added row, define a rule with a StopGoBack action and the settings a trace has to meet to trigger the action. |
| 3. | Select the Enable check box to activate the defined rule. |
| 4. | Click Apply to save the changes in the rule configuration. |
| 5. | In the Go Back window, set up the Apply StopGoBack rules option to Yes, as explained in the procedure Go back to earlier stored traces. |
| 6. | Click OK in the Go Back window |
When the Go Back stops on a trace matching the StopGoBack rule, click Run to resume the Go Back action.
If you disable a StopGoBack rule after starting a Go Back action, you need to click Continue in the Go Back window for the rule to be effectively disabled in the current Go Back action. Clicking Run in the main window is not sufficient.
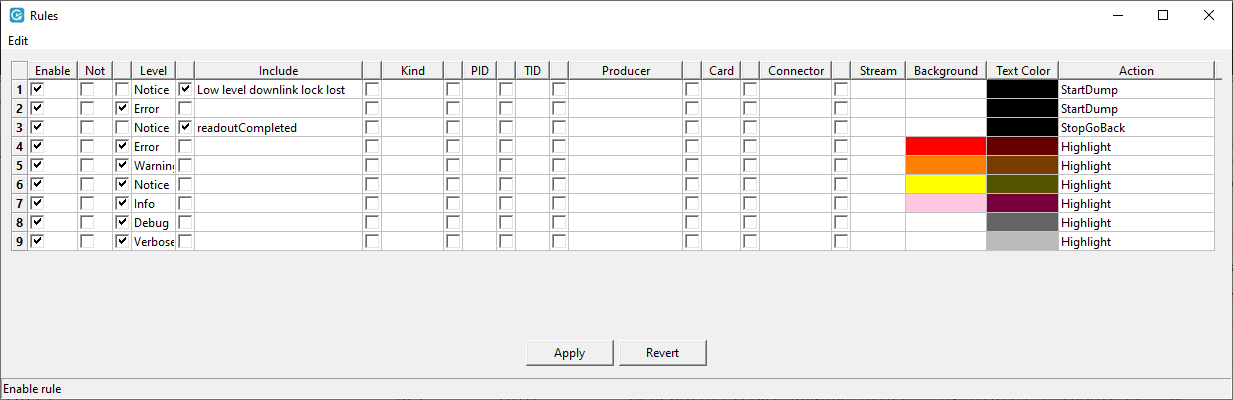
In this example, the row 3 is a StopGoBack rule:
| ● | If a trace contains the readoutCompleted text string, the Go Back action will stop when finding a trace containing this text string. |
If more than one StopGoBack rule is defined, they will all be applied.
To increase the font size, use one of the following keyboard combinations:
| ● | Press Z |
| ● | Press CTRL + + (in the numeric pad) |
To decrease the font size, use one of the following keyboard combinations:
| ● | Press SHIFT + Z |
| ● | Press CTRL + - (in the numeric pad) |