Tool and Images
EasyClassify is the deep learning classification library of Open eVision (EClassifier class).
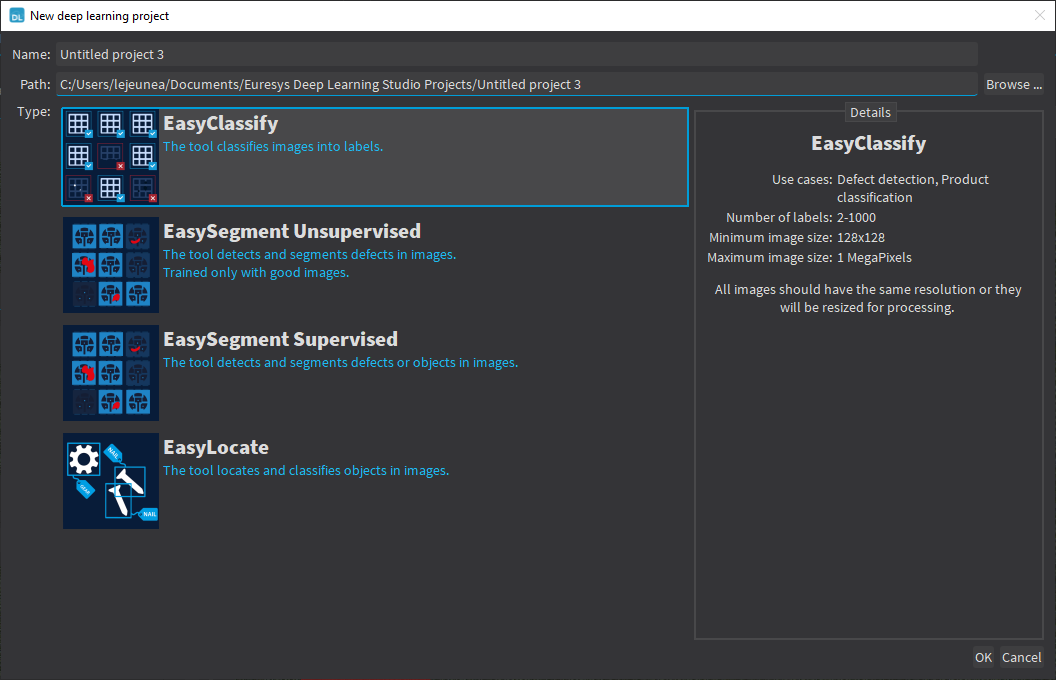
Deep Learning Studio
To create an EasyClassify project in Deep Learning Studio:
|
1.
|
Start Deep Learning Studio. |
|
2.
|
Create a new project and select EasyClassify in the New deep learning project dialog.
|
Tool properties
Capacity
|
●
|
The Capacity of the neural network (default: Normal) represents the quantity of information that it is capable of learning. |
|
□
|
We recommend you to first train a Normal network on your dataset. |
|
►
|
If the learning is working: |
|
□
|
Try to use the Small or the Large network to get the performance (inference speed and accuracy) that best matches your application. |
|
►
|
If the learning does not work it means either that: |
|
□
|
Your dataset image resolution is too small (below 128 × 128): try to use the Extra Small network that specifically targets such cases. |
|
□
|
Your dataset is complex and difficult: try to use the Extra Large network that specifically targets such cases. |
Use pretrained model
|
●
|
A pretrained model should give faster convergence time and better accuracy for all the datasets except for extremely large datasets (> 10 000 images). |
|
●
|
A pretrained model works by initializing the neural network with the weights learned on a large and complex dataset. |
|
□
|
This allows to transfer the knowledge of some universal features (such as edges, corners...) learned on this dataset to your dataset. |
|
□
|
If you do not use a pretrained model, the neural network is initialized randomly. |
|
NOTE:
|
You cannot use the histogram equalization with pretrained weights as it would lead to poor training results. |
Compute the heatmap
|
●
|
If this option is checked, the tool computes the heatmap along with each result. |
|
►
|
Note that this option makes the computation of the results a bit slower but twice faster than computing the result and then computing the heatmap separately. |
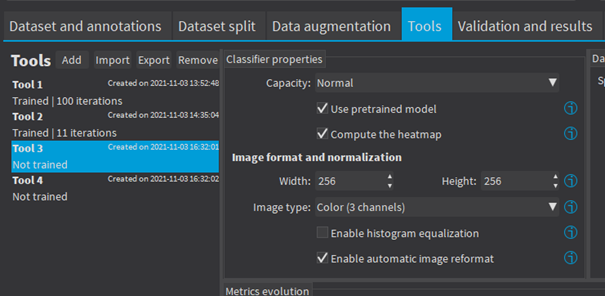
Image format and normalization
Width, Height, Image type and Enable automatic image reformat
|
●
|
The input image format must have the width, height and number of channels corresponding to the input of the neural network. |
|
●
|
By default, a classifier uses the image format of the first image inserted in the training dataset: |
|
□
|
All other images are automatically reformatted (anisotropic rescaling and conversion between color and grayscale). |
It is recommended to use a width and heigh of at least 224 × 224, as the performances may start to deteriorate if the height or/and the width are smaller.
|
●
|
In Deep Learning Studio, you can set the input image format in the Classifier properties of the tools that you create in the Tools tab. |
|
●
|
In the API, you can also set manually the input image format with the methods SetWidth, SetHeight and SetChannels (1 channel for grayscale images and 3 channels for color images). |
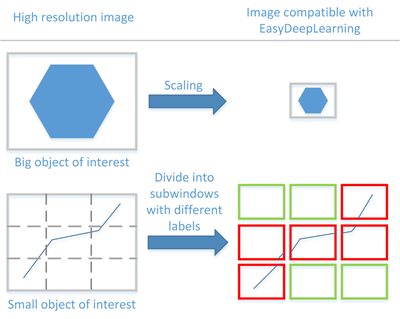
Image resolution
The input image format must have a resolution of at least 128 x 128 for the normal and the large capacity or 64 x 64 for the small capacity and at most 1024 x 1024.
For the best processing speed, use the lowest resolution at which your "objects of interest" are still recognizable.
|
●
|
If your original images are smaller than the minimum resolution, upscale them to a resolution higher or equal to 128 x 128. |
|
●
|
If your original images are larger than the maximum resolution, lower the resolution: |
|
□
|
If the "objects of interest" are still recognizable, explicitly set the input image format of the classifier to this lower resolution. |
|
□
|
If the "objects of interest" are not recognizable, divide your original images into sub-windows and use these sub-windows to train the classifier and make predictions. This presents the additional advantage of localizing the "object of interest" inside the original image. |
Enable histogram equalization
The classifier can also apply an histogram equalization to every input image:
|
□
|
In Deep Learning Studio, activate it in the image format controls in the Image properties and augmentation tab. |
|
NOTE:
|
You cannot use the histogram equalization with pretrained weights as it would lead to poor training results. |
Training
To train your tool, see Training a Deep Learning Tool.