Installing Open eVision
Installer Package
Open eVision comes as a single installer package "Open_eVision_Installer_2.1.0.msi". It contains everything needed to run or develop applications using Open eVision
Installation Types
- Complete: Everything needed for running or developing applications is installed on the system.
- Typical: Same as Complete, with the exception of Legacy components and VC++ 6.0 specific components.
- Runtime: Installs all binaries needed to run applications using Open eVision on the system.
- Custom: Allows to select exactly what components will be installed on the system.
Older Versions
Open eVision will not replace other Open eVision major versions, but install alongside. If the major version is identical, minor versions releases as well as maintenance releases will update automatically
Command-Line Interface
To install Open eVision with the command line, use:
msiexec /i "Open_eVision_Installer_2.1.0.msi" /qn INSTALLTYPE=[install_type]"
Where [install_type] can be Complete, Typical or Runtime. By default, installation type is 'Typical'.
For the command prompt to wait for the end of the installation add 'start /wait' at the start of the command:
start /wait msiexec /i "Open_eVision_Installer_2.1.0.msi" /qn INSTALLTYPE=[install_type]"
License Activation
Open eVision licenses are activated from the Open eVision License Manager. The License Manager can be launched at the end of the installation, or from the Windows start menu.
Note:On Windows XP, the license Manager requires .NET 2.0.
Supported platforms and requirements
Windows Embedded Standard 2009 can install drivers and applications after FBA completes.
It is recommend to install Open eVision as follows:
- Add mandatory components to the Run-Time Image using Target Designer
- .Net framework 3.0 setup component: For Open eVision license manager
- Windows Installer Service component: For Open eVision to install C/C++ run-time libraries.
- Open eVision license manager needs either the internet support components for online activation, or USB Flash for an offline activation:.
- Sysprep (Windows System preparation) Component or System Cloning Tool Component: To reseal the "Master Target" before deploying the image to multiple devices.
Note: To prevent System Cloning Tool from executing FBRESEAL automatically when FBA finishes:
Set System Cloning Tool Settings Reseal Phase to Manual, or change System Cloning Tool Advanced SettingscmiResealPhase from 12000 to 0.
- Install Open eVision 2.1 and newer on the "Master Target"
- Once the Pre FBA OS Image has been built, boot the "Master Target" and allow FBA to complete.
- When the "Master Target" has been booted for the second time, install the Open eVision libraries using the standard installer provided.
- Optionally, install your own final application based on Open eVision, include all the run-time libraries needed by your application.
- Reseal the master package ready for mass deployment
- Run FBRESEAL or Sysprep. Once the computer shuts down, this image is the master.
Each time you deploy the "Master" in a new device, the Open eVision libraries need to be activated as described in the license manager documentation.
Include the header (Open_evVsion_2_0.h) located in the installation folder > Include subfolder. No linker settings are required.
Microsoft Visual Studio C++ environments automatically adds the Open eVision Include folder at installation time. This must be done manually for Borland/CodeGear C++ environments.
Add a reference to the Open_eVision_NetApi_2_1.dll in the development environment. No other DLL must be copied.
Add a reference to the Open_eVision_ActiveXApi_2_1.dll component.
- If you are using the regular API (new style API with exceptions and namespaces)
- Open your project settings, and add the following preprocessor macro definition:
DO_NOT_USE_INLINE_OPEN_EVISION_2_1 - Add the Open_evVsion_2_0_VC6_Release.lib and Open_evVsion_2_0_VC6_Debug in the corresponding configuration linker settings.
These files are in the Open eVision installation folder.
- Open your project settings, and add the following preprocessor macro definition:
- If you are using the legacy support API (compatible with eVision 6.7.1):
- Open your project settings, and add the following preprocessor macro definition:
DO_NOT_USE_INLINE_LEGACY_OPEN_EVISION_2_1 - Add the Legacy_Open_evVsion_2_0_VC6_Release.lib and Legacy_Open_evVsion_2_0_VC6_Debug in the corresponding configuration linker settings.
These files are in the Open eVision installation folder.
- Open your project settings, and add the following preprocessor macro definition:
- If you are using both the regular API and the legacy support API, you must perform all steps (and thus all the relevant libraries to your solution).
In order to use these libraries, your program must use the Multithreaded DLL (/MD) or Multithreaded Debug DLL (/MDd) code generation flags.
Visual Basic 6.0
Add a reference to the Open_eVision_ActiveXApi_2_1.dll (menu: "Project > Add Reference"). All objects are then directly usable in Visual Basic.
To configure projects in Embarcadero RAD Studio XE4 and XE5 to use Open eVision:
- Create a new C++ project.
- Add the Open eVision include path to the project dependencies.
- Define DO_NOT_USE_INLINE_OPEN_EVISION_2_1 in the project settings.

- Include "Open_evVsion_2_0.h" in the .cpp files where you want to use Open eVision.
- Add "Open_evVsion_2_0.cpp" to the project.

- In both Debug and Release, modify the local C++ compiler options of the "Open_eVision_2_0.cpp" file:

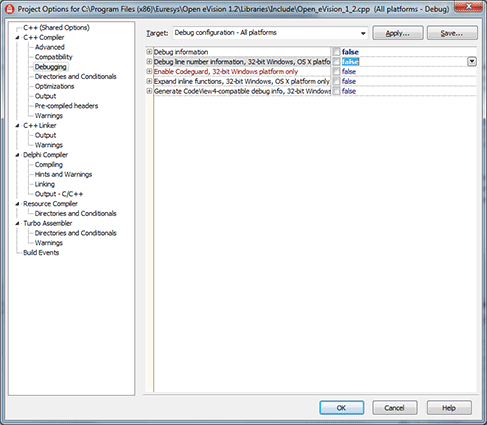
- In Debugging:
- Set Debug information to False.

- Set Debug line number information to False.

- Set Debug information to False.
- In Optimization, set Disable all optimizations to True.

- In Compatibility/General, set Global functions in segments to False.


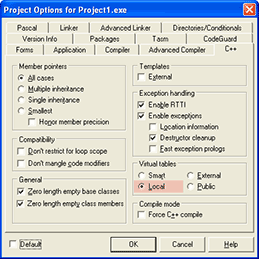
An error may occur due to a limitation in the number of functions (and virtual functions) in a single translation unit:
BCB6 Error E2491: Maximum VIRDEF count exceeded; check for recursion
If this problem occurs, change the Virtual tables C++ option to Local:
When using Open eVision objects as members of Borland GUI classes, like TDialog for instance, an unhandled exception can occur when the application is closed. To avoid this issue, create Open eVision objects dynamically using new and delete them in the destructor of the parent class.
Note: Open eVision must be previously installed with the Legacy ActiveX option.
You must use the ActiveX DLL ("Component > Import Component... > Import .NET Assembly").
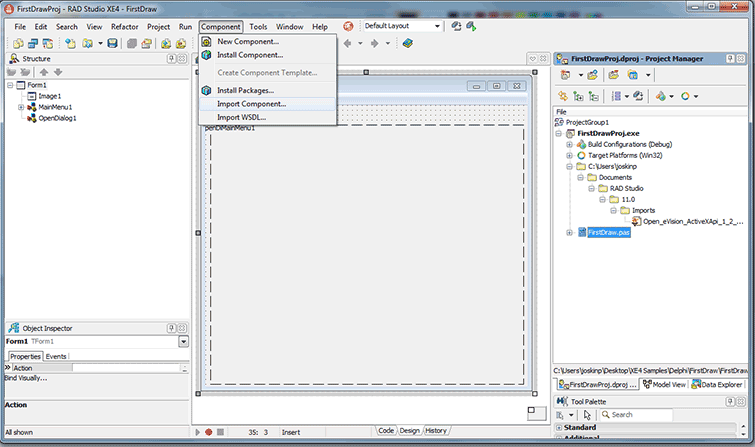
- Create a new Delphi project.
- In the Component menu, click on Import Component.

-
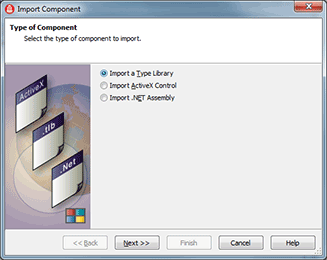
Select the Import a Type Library option, then press Next.

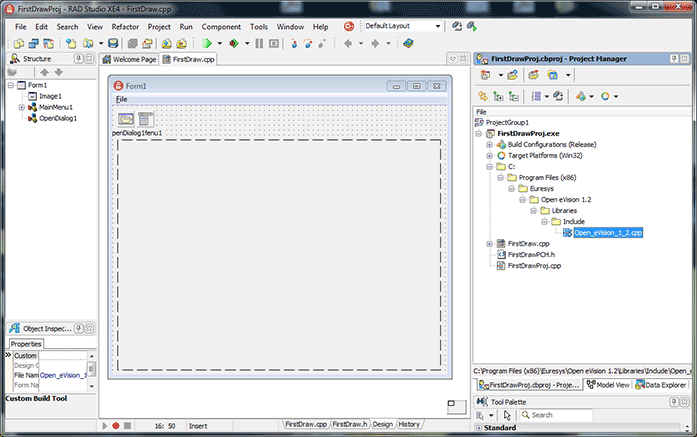
- Select Open_eVision_ActiveXApi_2_1 in the list, then press Next.

- Don't change anything on the next form and press Next.
- Select Add unit to project then press Finish.