Configuration
First Boot
|
1.
|
Apply power and check if the Power OK green LED turns on. |
|
2.
|
Wait about one minute until the completion of the boot procedure. |
|
3.
|
Check if the Video Present LED indicators of all inputs attached to a valid
video source are turned ON. |
First Network Session
|
1.
|
Install the Euresys ONVIF Device Scanner application software utility on
a Windows or Linux computer attached to the same LAN. |
|
2.
|
Ensure that at least one of the following conditions is satisfied on the LAN: |
|
□
|
A DHCP server is active and authorized to deliver an IP address for the
MAC address of the LAN interface. |
|
□
|
The computer TCP/IP stack is configured for dynamic IP allocation. |
|
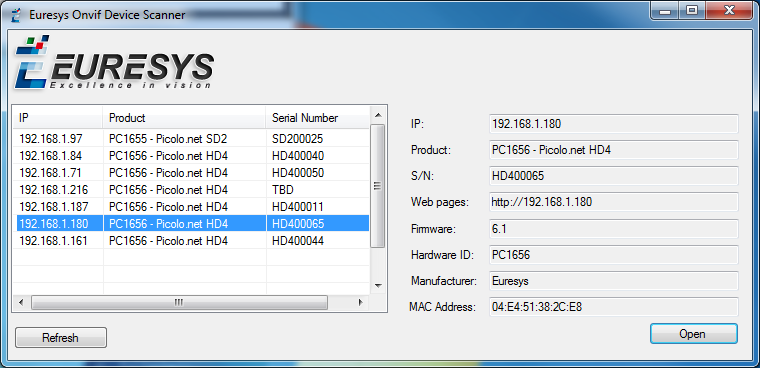
3.
|
Run the Euresys ONVIF Device Scanner utility. At the completion of the
scanning process, all discovered ONVIF devices appear in the discovered ONVIF
devices list. |
|
4.
|
Select a device in the list by clicking its [IP] field. The right pane displays
the properties of the selected device. |
|
5.
|
Open the device Home page by clicking the [Show] button. |
The ONVIF Device Manager application software utility can also be used . ONVIF Device
Manager is available on : http://sourceforge.net/projects/onvifdm/
Manage the media profiles (optional)
The Profile Management page allows the user to view/edit/delete and create media
profiles. An auto-setup procedure that automatically creates media profiles suited
to the connected cameras is also available.
Manage the configurations (optional)
The Configuration Management page allows the user to:
|
●
|
View the video source configurations, |
|
●
|
View and edit the video encoder configurations, |
|
●
|
View and edit the metadata configurations. |
Manage the device (optional)
The Device Management page has four tabs:
|
●
|
The Network tab allows the user to view/edit the device host name, the IP
address, the DNS, and the default gateway settings. |
|
●
|
The Time tab allows the user to view/edit the time and date, and NTP
settings. |
|
●
|
The Discovery tab allows the user to enable/disable the device discovery, and to
manage the ONVIF scopes. |
|
●
|
The Maintenance tab allows the user to reboot the device, to revert the device
to factory settings, and to upload firmware. |
Manage the X.509 certificates (optional)
If you want a fully secured HTTPS connection through the Picolo.net HD1 web interface, you need to make sure the self-signed certificate delivered with Picolo.net HD1 gets signed by an intermediate certificate authority (CA).
See Using X.509 Certificates for more information.