Correcting Shear Effect
Objective
Following this tutorial, you will learn how to use EasyImage to correct a shear effect in an image. The following image is taken by a line-scan camera. The camera sensor was misaligned, resulting in a so-called shear effect.
You'll need first to load an image (step 1), create a destination image (step 2), and then set pivots parameters to perform the correction (step 3).
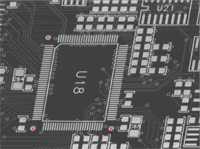
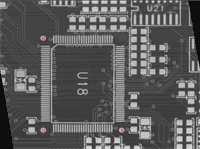
Source image, with a shear effect (left) and corrected image (right)
Step 1: Load the source image
|
1.
|
From the main menu, click EasyImage, then Register. |
|
2.
|
Click the Open icon of the Source Image area, and load the image file EasyImage\Shear.tif. |
|
3.
|
Keep the default variable name for the new image , and click OK. Three pivots points appear in the image. |
Step 2: Create a destination image
|
1.
|
Click the New icon of the Destination Image area. |
|
2.
|
Enter '768' and '576' as image width and height, and click OK to accept the default name. Three pivots points appear in the image. |
Step 3: Set the pivots parameters
|
1.
|
In the source image, using the mouse, drag each pivot to the center of the fiducial marks (the dots around the U18 area). |
Notice that the source pivots coordinates, in the Register dialog box, have changed accordingly.
|
2.
|
To correct the image, enter the following destination pivots coordinates: |
|
3.
|
Click Execute to perform the operation. |