Detecting a Horizontal or Vertical Line Using Projection
Objective
You'll need first to load a source image (step 1), set a vector (step 2), and then detect the defect (horizontal line) (step 3).
Defects can be detected using the image projection
Step 1: Load the source image
| 1. | From the main menu, click EasyImage, then Projection. |
| 2. | Click the Open icon of the Source Image area, and load the image file EasyImage\Leather.bmp. |
| 3. | Keep the default variable name for the new image object In a general content, the term object should be understood with the meaning of a class instance. In EasyObject, an object is a maximally-sized area of adjacent connected pixels belonging to the layer foreground., and click OK. |
Step 2: Set the destination vector
| 1. | Click the New icon in the Destination Vector area. |
| 2. | Select the BW32 option for the vector type, and click OK. |
Step 3: Detect the defects
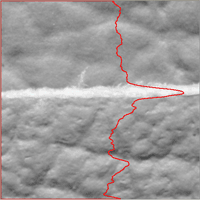
| 1. | In the Image Projection dialog box, select the column button, and click Execute to perform the operation. |
| 2. | The resulting vector and the corresponding plot are displayed in the destination vector window. The graphical result also appears on the image. Each vector value is the sum of all pixels values across the corresponding horizontal row (or vertical column). By this mean, horizontal (or vertical) defects are easily detected. |