Detecting the Corners of an Object Using Hit-and-Miss Transform
Objective
You'll need to load a source image (step 1), set the kernel that represents a top corner (step 2), and then set a destination image and simply execute the hit-and-miss transform (step 3).


Source image (left) and top corner detected in the source image (white dot)
Step 1: Load the source image
| 1. | From the main menu, click EasyImage, then Hit And Miss. |
| 2. | Click the Open icon of the Source Image area, and load the image file EasyImage\Diamond.bmp. |
| 3. | Keep the default variable name, and click OK. |
Step 2: Set the hit-and-miss kernel
| ● | In the Hit And Miss dialog box, set the kernel according to the following values: |
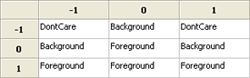
Kernel that detects top corners
Step 3: Apply the hit-and-miss transform
| 1. | Click the New icon of the Destination Image area. |
| 2. | Keep the default parameters and variable name, and click OK. |
| 3. | Click Execute to perform the operation. |
The top corner (white dot) is detected.
| 4. | Try with other kernel configurations to detect the other corners. |