Performing Thresholding on Color Images
Objective
You'll need first to load a color source image, create a destination image, and a color lookup table (steps 1-3). Then, you'll set the color system and tune each component tolerance to get a satisfying segmentation of the solder pads (step 4).
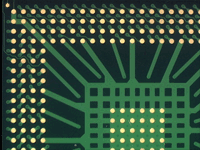
Source image
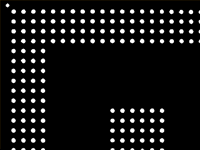
Thresholded image
Step 1: Load the source image
| 1. | From the main menu, click EasyColor, then Threshold. |
| 2. | Click the Open icon of the Source Image area, and load the image file EasyColor\BGA Substrate Color.jpg. |
| 3. | Keep the default variable name for the new Image object In a general content, the term object should be understood with the meaning of a class instance. In EasyObject, an object is a maximally-sized area of adjacent connected pixels belonging to the layer foreground., and click OK. |
| 4. | Disable the Preview Mode check-box to see the raw source image. |
Step 2: Create a destination image
| 1. | Click the New icon of the Destination Image area. |
| 2. | Keep the default variable name for the new Image object, and click OK. |
Step 3: Create a color lookup table
| 1. | Click the New icon of the Color Lookup area. |
| 2. | Keep the default variable name for the new color lookup object, and click OK. |
Step 4: Perform the color segmentation
| 1. | Select LSH from the Color System drop-down list. |
| 2. | In the source image, click in a golden pad. The pixel lightness, saturation and hue values are updated in the Color Threshold dialog box. |
| 3. | Adjust the tolerance of lightness and saturation to enlarge the range of thresholded pixels, until you get a satisfying segmentation in the destination image. |