Detecting Differences Between Images Using Min-Max References
Selecting and Sorting Blobs
Objective
Following this tutorial, you will learn how to use EasyObject to compare images. In this example, we will check the quality of a PCB film.
You'll need first to load a reliable source image (step 1), from which two reference images (min and max) will be built (step 2). Then you'll load another image to be inspected (step 3), and perform the comparison with the min and max reference images (step 4). The differences will be detected.


High (left) and low (right) threshold reference images
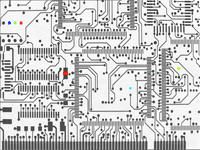
In another image, differences are detected
Step 1: Load the source image
|
1.
|
From the main menu, click EasyObject, then Make Min Max. |
|
2.
|
Click the Open icon of the Source Image area, and load the image file EasyObject\FilmOk.png. |
|
3.
|
Enter 'filmOk' for the name of the new image, and click OK. |
Step 2: Build min and max reference images
|
1.
|
Click Execute. Min and Max reference images are created, based on the source image. |
|
□
|
filmOkMax is computed by dilating filmOk a given number of times ('geometric margin') and adding a constant ('gray level margin') to every pixel. filmOkMin is computed by eroding filmOk the same number of times and subtracting the same constant to every pixel. |
|
□
|
The geometric margin can be seen as a position tolerance between the image to be inspected and the reference. |
|
□
|
The gray level margin introduces a tolerance to lighting variations. |
Step 3: Load an image to be inspected
|
1.
|
From the main menu, click EasyObject, then New EasyObject Tool. |
|
2.
|
Keep the default variable name for the new object, and click OK. |
|
3.
|
In the Encoder tab, click the Open icon of the Source Image area, and load the image file EasyObject\FilmBad.png. |
|
4.
|
Enter 'filmBad' for the name of the new image, and click OK |
Step 4: Compare the image with the reference images
|
1.
|
In the Encoder tab, select ImageRange in the segmentation method drop-down list. |
|
2.
|
Disable the White Layer check-box, and enable the Black Layer check-box. |
|
3.
|
Click the ... button around the High Image field. Select filmOkMax in the drop-down list, and click OK. |
|
4.
|
Click the ... button around the Low Image field. Select filmOkMin in the drop-down list, and click OK. |
|
5.
|
Click Encode. Eight differences are highlighted in the image. |
|
6.
|
Click Results to get further information about the detected objects. They may be further filtered and analyzed using object features selection and sorting capabilities of EasyObject. |