Detecting Printing Errors Using a Flexible Mask
Generating a Flexible Mask from an Encoded Image
Objective
Following this tutorial, you will learn how to use a flexible mask to target and search specific areas in the image.
You'll need first to load a source image (step 1), and a flexible mask image (step 2), that can be automatically applied on the source image to separate do-care areas (that must be considered) and don't-care areas (that should not be considered). Then, you'll perform the inspection only on do-care areas (step 3).
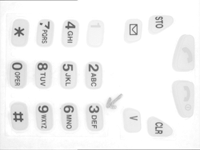
Source image

Mask image
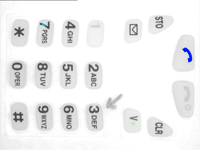
Results
Step 1: Load the source image
|
1.
|
From the main menu, click EasyObject, then New EasyObject Tool. |
|
2.
|
Keep the default variable name for the new object, and click OK. |
|
3.
|
In the Encoder tab, click the Open icon, and load the image file EasyObject\Mobile3.jpg. |
|
4.
|
Keep the default variable name for the new image, and click OK. |
Step 2: Load the flexible mask image
|
1.
|
In the Encoder tab, click the Open icon, and load the flexible mask image file EasyObject\MobileMask.bmp. |
|
2.
|
Enter 'mask' for the name of the new image, and click OK. In the Mask area of the Encoder tab, notice that the mask image is selected from the drop-down list: the mask is automatically applied on the source image, because its name contains 'mask', and because it has been loaded from the coded image dialog box. The source image preview in the dialog box shows (in red diagonal lines) the don't-care area, that is the area that will be not be considered when encoding the source image. |
Step 3: Inspect the image
|
1.
|
In the Segmentation area of the Encoder tab, click the ... button to display the threshold dialog box. |
|
2.
|
Select Absolute and enter 202 for the threshold. Click OK to close the dialog box. |
|
3.
|
Click Encode to locate the objects (in the do-care areas only). In the source image, each object is drawn using a different color. Three printing errors can be observed: |
|
□
|
The digit '7' is partially printed. |
|
□
|
The '+' sign is missing. |
|
□
|
The handset is printed on a lighter tone. |
|
4.
|
Click Results to display the statistics on each object. |
|
□
|
Selecting an object in the list highlights it in the image. |
|
□
|
Selecting Columns and Drawing will display more options. |